Every well-equipped off-roader has shackles on board. If they are steel shackles, they are probably one of the two common shapes, or even both. But where are the differences? Can shackles be used wrongly, and what do the numbers on them mean? Matsch&Piste explains everything you need to know.
If you have thought about whether to use a steel or a soft shackle and gone for steel, then hand on heart. Did your thoughts go any further than the load rating, the WLL? Probably not. And if the shape of the shackle did play a part, then perhaps only in terms of whether it fits over a tow ball or not. There is a bit more to say about a shackle than just the shape and the WLL. Because it matters to us that a recovery goes safely, we have written this little shackle ABC for you, to let you in on the not-so-secret secrets of steel shackles.
What we say generally about using steel shackles, what WLL or FTF mean, and how to work correctly with a winch, shackles and snatch blocks, you will find in these articles:
The make-up of the steel shackle
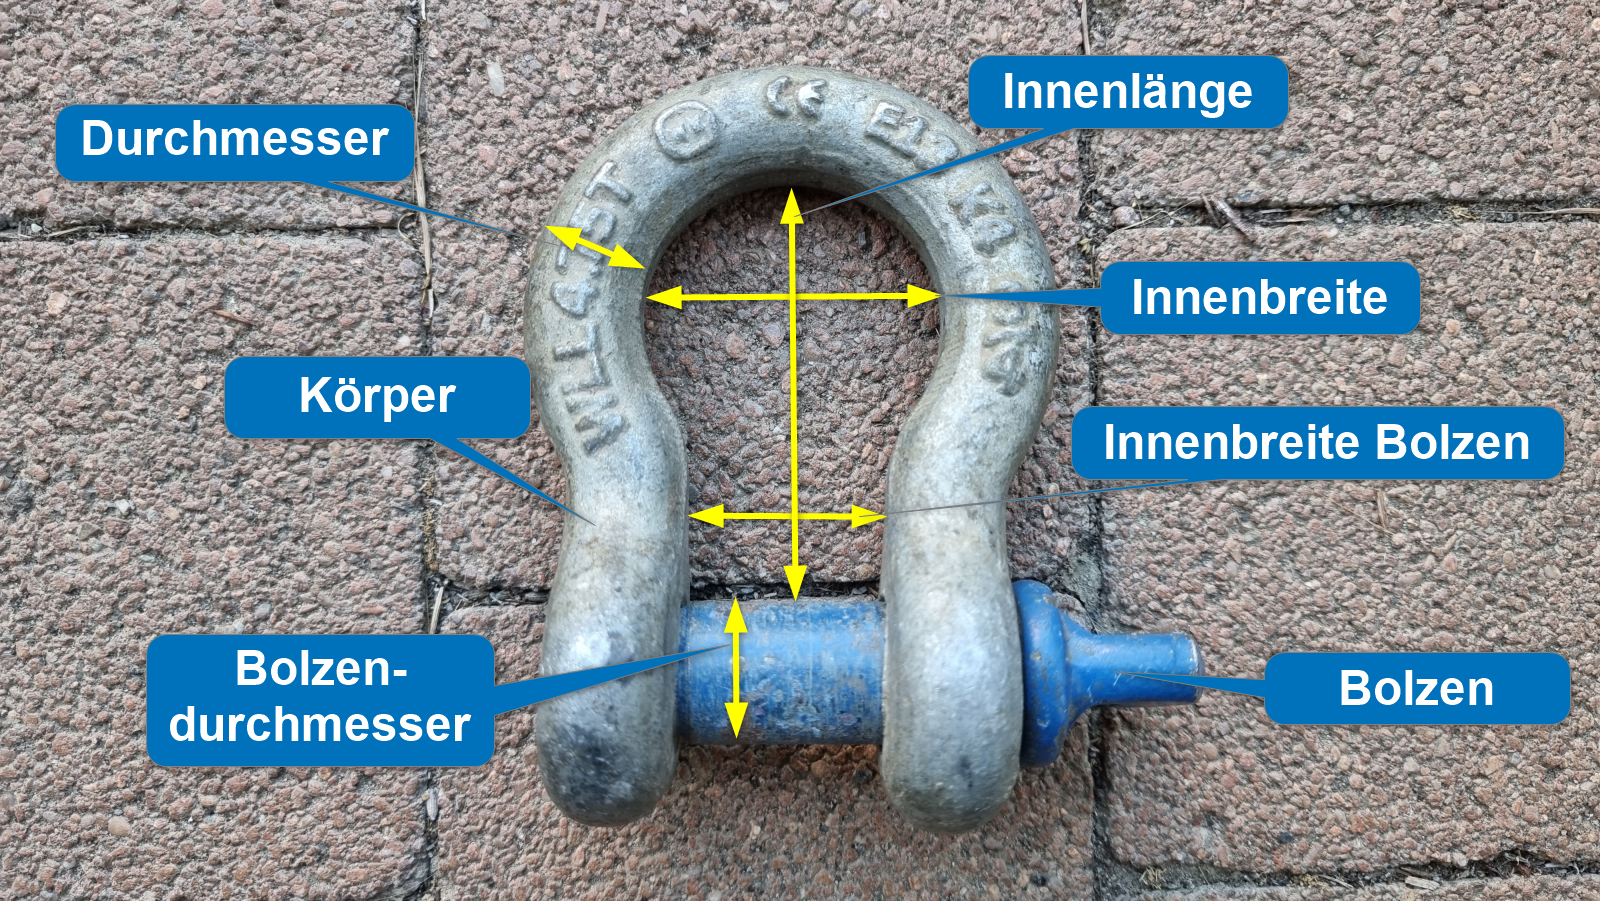
A shackle is made up of only a few parts. Strictly speaking at least two, at most four. So there are only a handful of terms, which you can take from the picture.
- Diameter: the diameter of the bow material. An important factor for the load rating.
- Pin diameter: on tested shackles the pin is thicker and a different colour.
- Inside width at the pin: how wide the shackle’s opening may be at most.
- Eye diameter
- Inside length
- Inside width (bow)
Proper markings
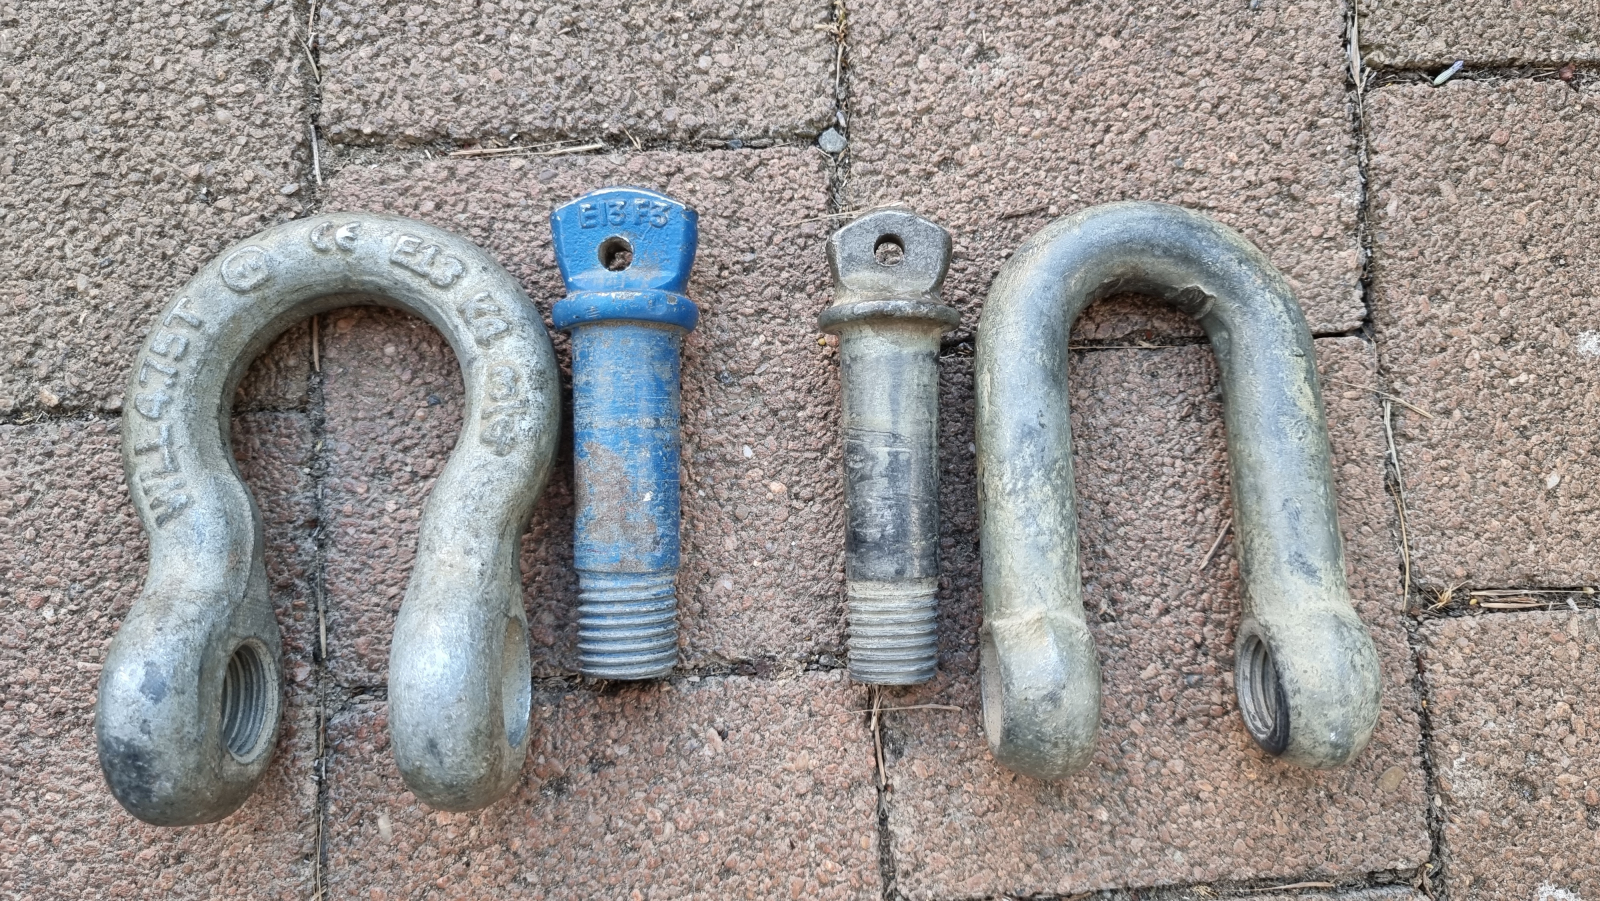
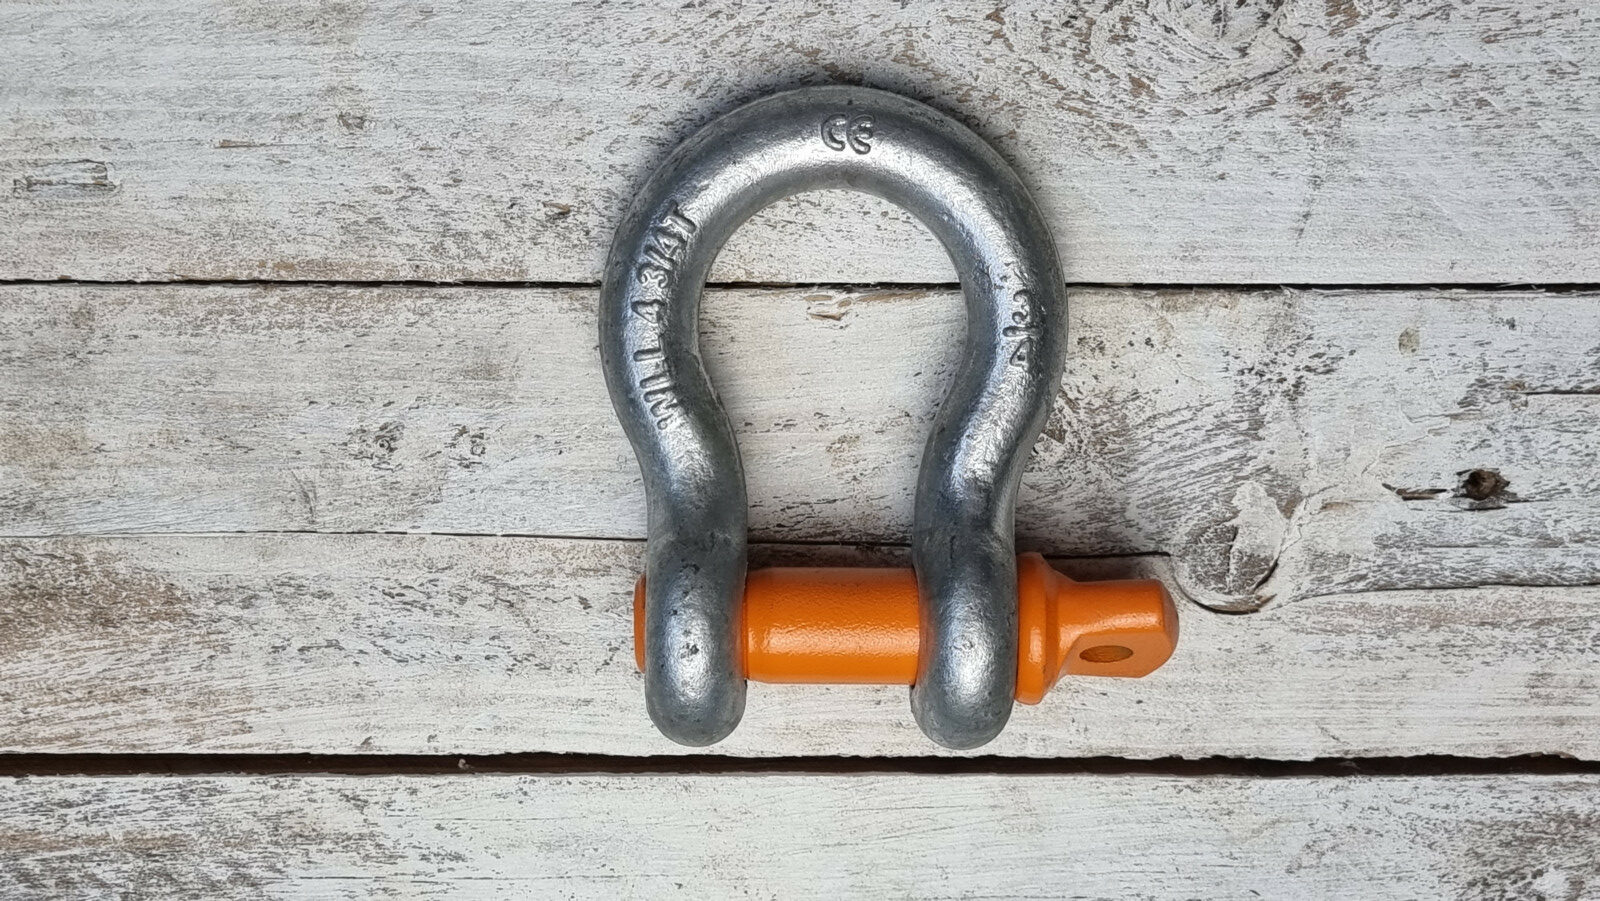
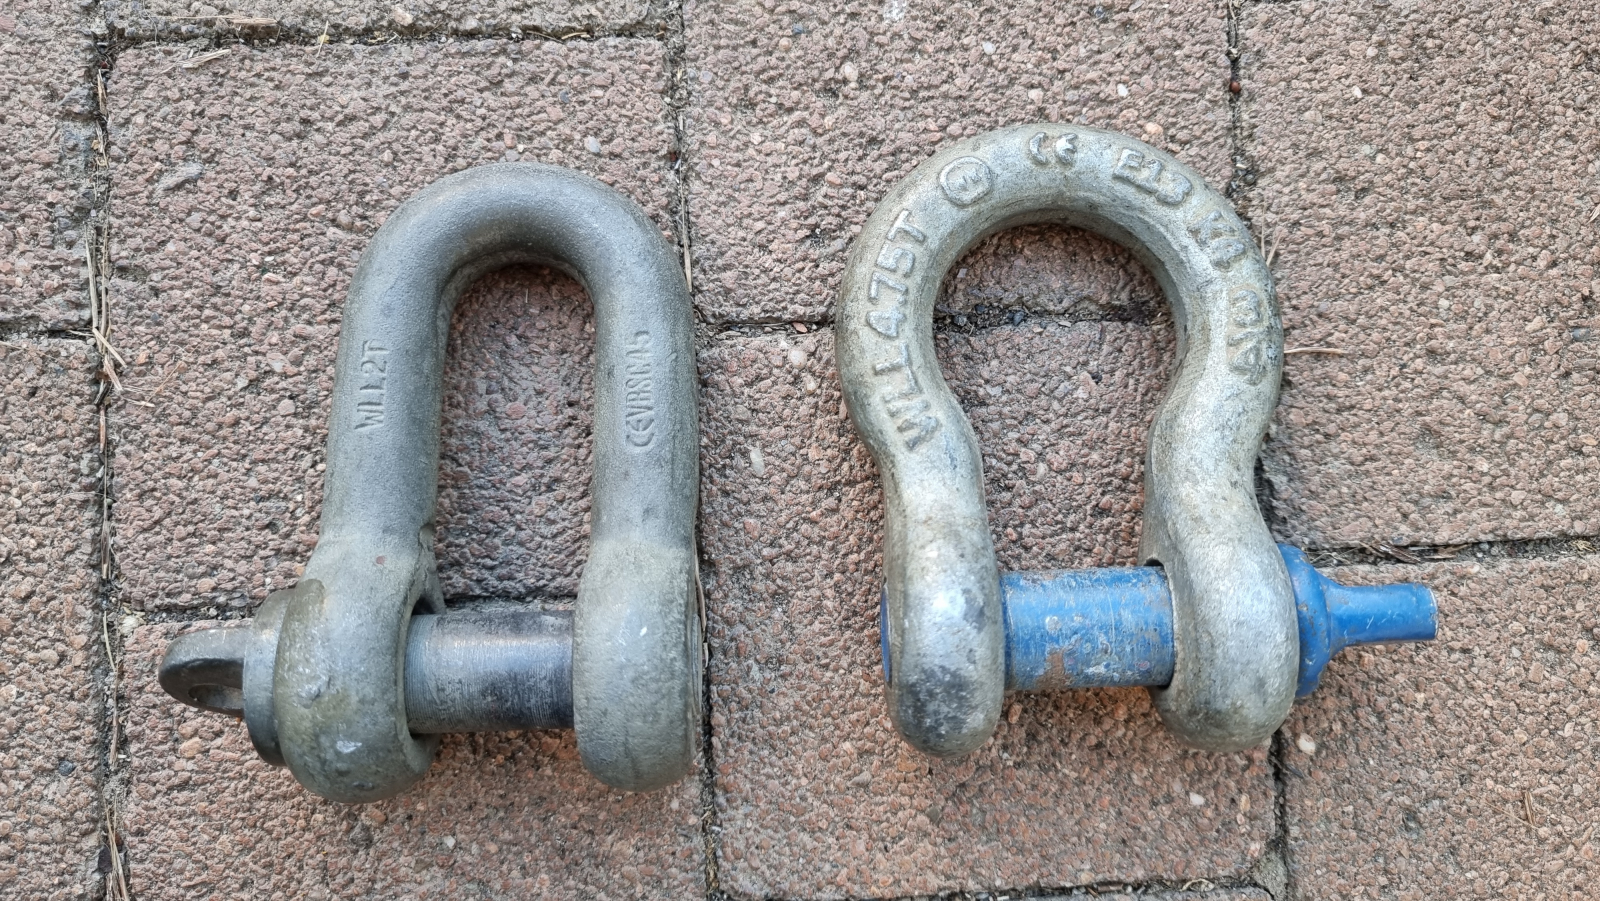
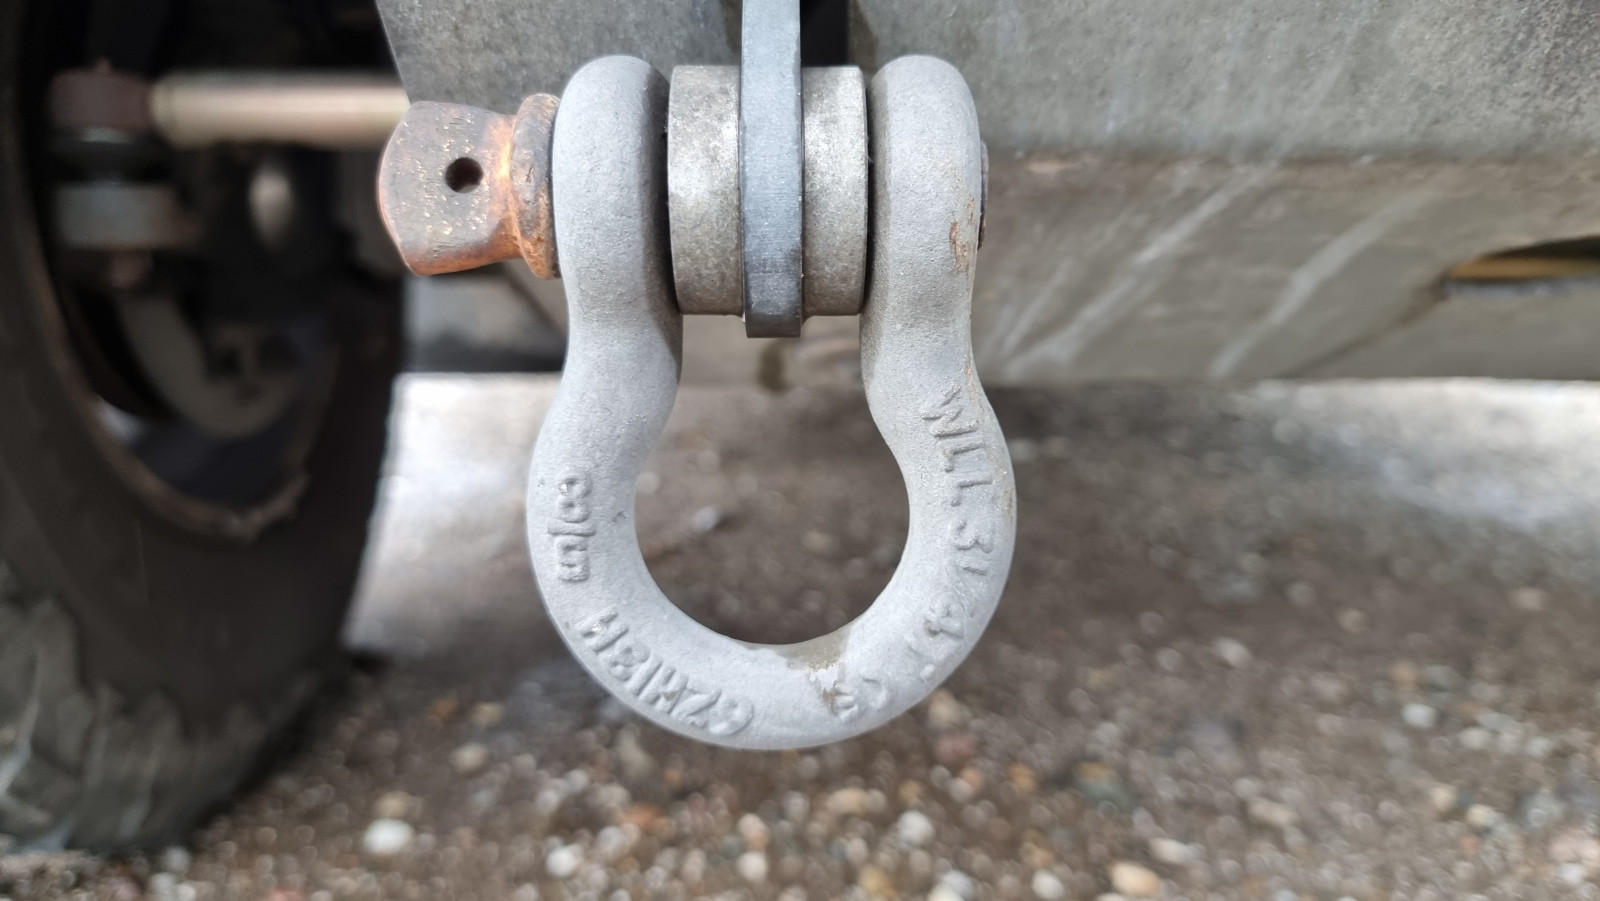
As with all other recovery gear, you should look out for proper markings. They tell you, on the one hand, what the limits are, and on the other, that these shackles have been properly tested. Such shackles have a few features: alongside the necessary details, which we will come to, the pin is a different colour from the body and its diameter is larger than that of the shackle body.
Since steel shackles were originally meant for lifting (suspended loads), the properly marked ones at least have a sixfold safety factor. So if the WLL is 4.75 t, the breaking load is 28.5 t. That means that even at double the WLL you do not bring the shackle anywhere near its limit.
If such a shackle were marked only for horizontal ground pull, its WLL would be a good 14 t. That is why you sometimes find the confusing note “WLL: 4.75 t FTF: 11 t” on steel shackles. The reason is that the FTF value actually only applies to ground pull, while the WLL applies to lifting. There the dynamic forces from the suspended, moving load have to be taken into account, which is why the WLL is set lower than the breaking load, or rather the safety factor is chosen larger. That shows how big the safety reserves are here.
Soft shackles usually have a double safety factor (2:1). That is why they must never be used for lifting. But if only the breaking load is given on the soft shackle, the safety factor can only be assumed.
The markings on the steel shackle
Under, among others, DIN standard 82101 for straight shackles and DIN standard 13889 for straight and bow shackles in lifting use, a steel shackle must carry at least the following details:
- Manufacturer or brand name
- Load capacity / payload / WLL (Working Load Limit)
- Grade or quality class of the steel, e.g. K4, 6, 8 or 10 (the higher, the stronger)
- Traceability code (batch number)
Often the size is also found on the shackle body.
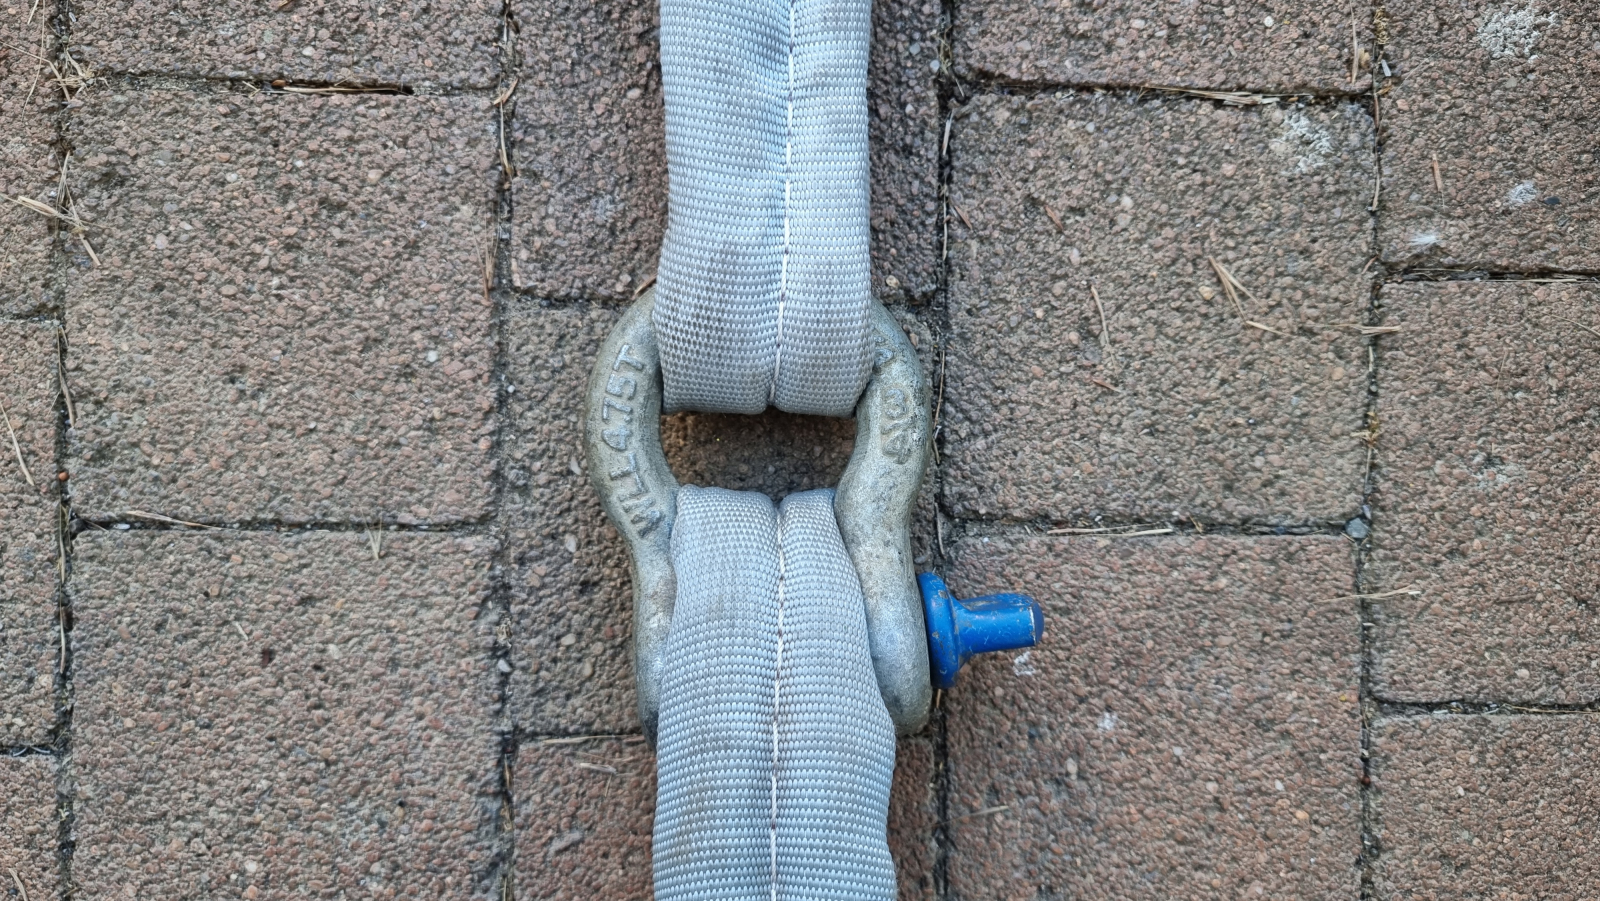
The pin must be marked too. With a diameter under 13 mm, the grade or the traceability code must be stamped on. If its diameter is larger, the grade, the traceability code and the manufacturer or brand name must be legible. The shackle in the following picture carries the WLL (4.75 t), the steel grade (K4), a manufacturer’s symbol and the nominal size (3/4 inch).
The shackle shape
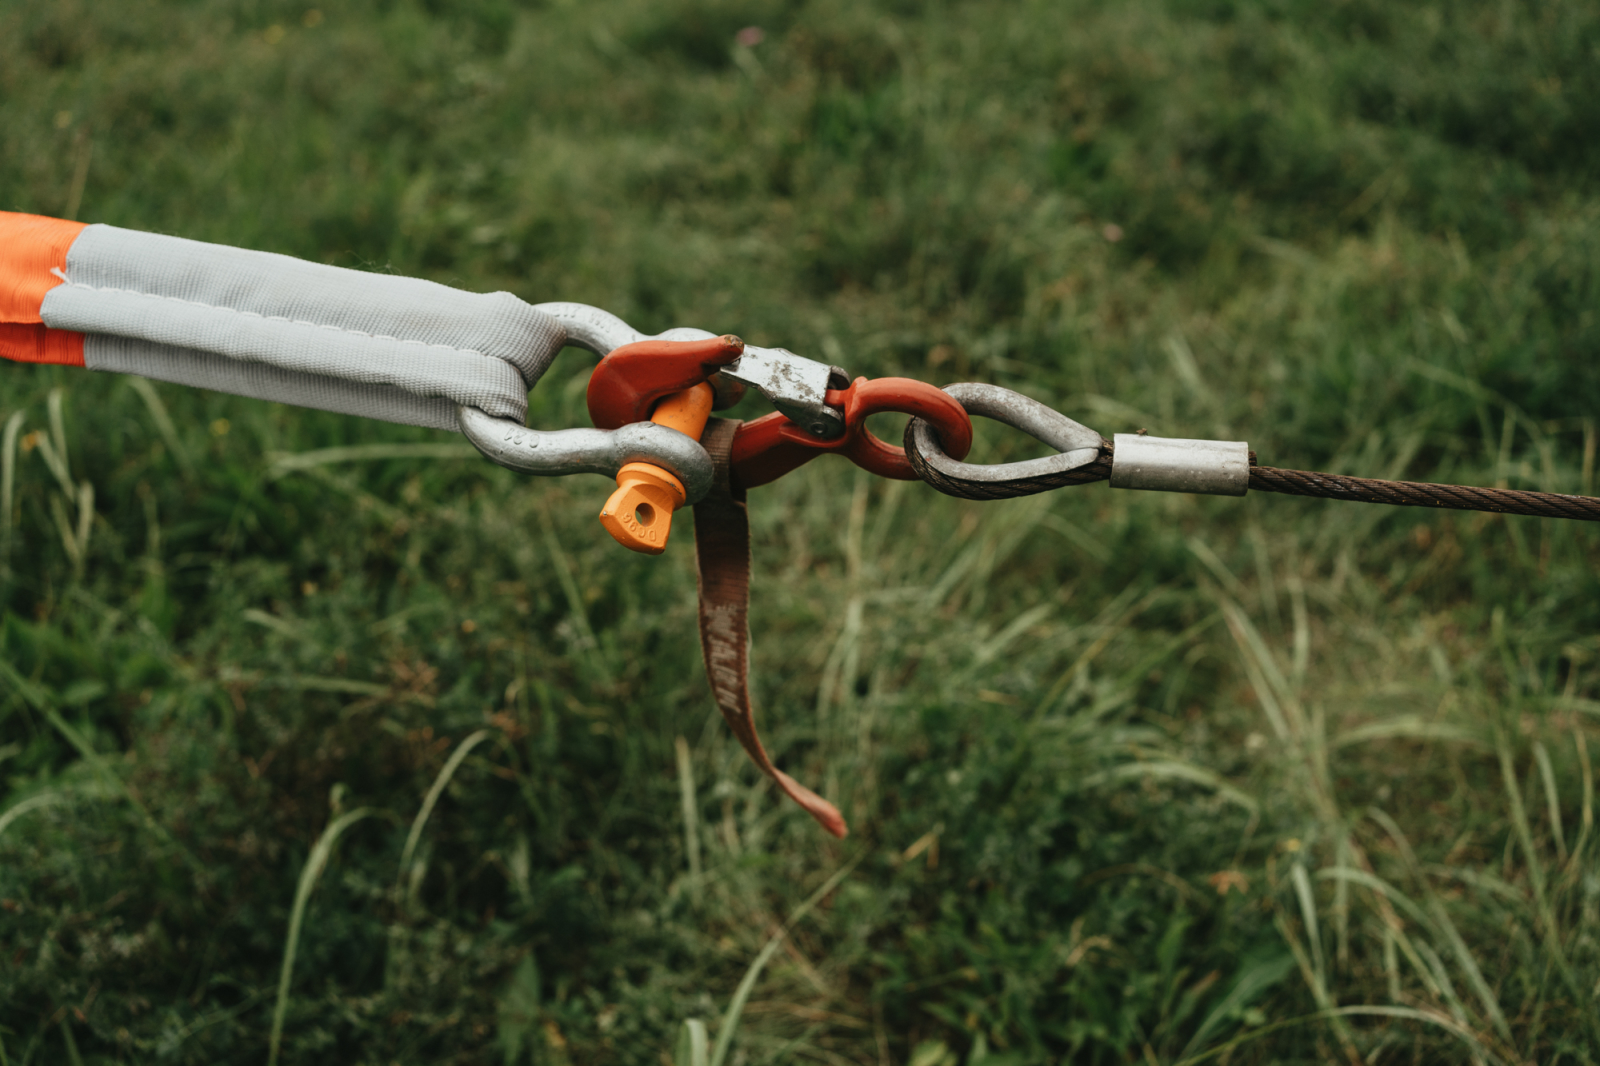
This article focuses on the two most common shapes of steel shackle, the straight shape (chain shackle, or D-shackle) and the bow shape (anchor shackle, or bow shackle). The main difference between the two is that you may only use the straight shackle in a straight pull. Otherwise it can bend or twist and break. As a rule, whenever it is possible, you should pull straight anyway.
The bow shackle may be loaded sideways in an angled pull (radial load). But that only holds if the same load is applied to both sides at the same angle. As a reminder, bow shackles come from lifting, where a suspended load is fastened with several slings and the slings then meet in the shackle at the same angle.
How radial load changes the WLL
An angled pull changes the forces that actually act, both on the shackle and on the slings. As strange as it sounds, the load in the individual sling becomes greater than the force you are pulling with. If the load does not act straight on the shackle, it can no longer carry its full rated load. This really must be kept in mind. As a rough rule, you can remember the following:
The angle is given from the longitudinal axis of the straight pull,
- 0° to 6°: 100% WLL
- 7° to 45°: only 75% WLL.
- 46° to 90°: only 50% WLL
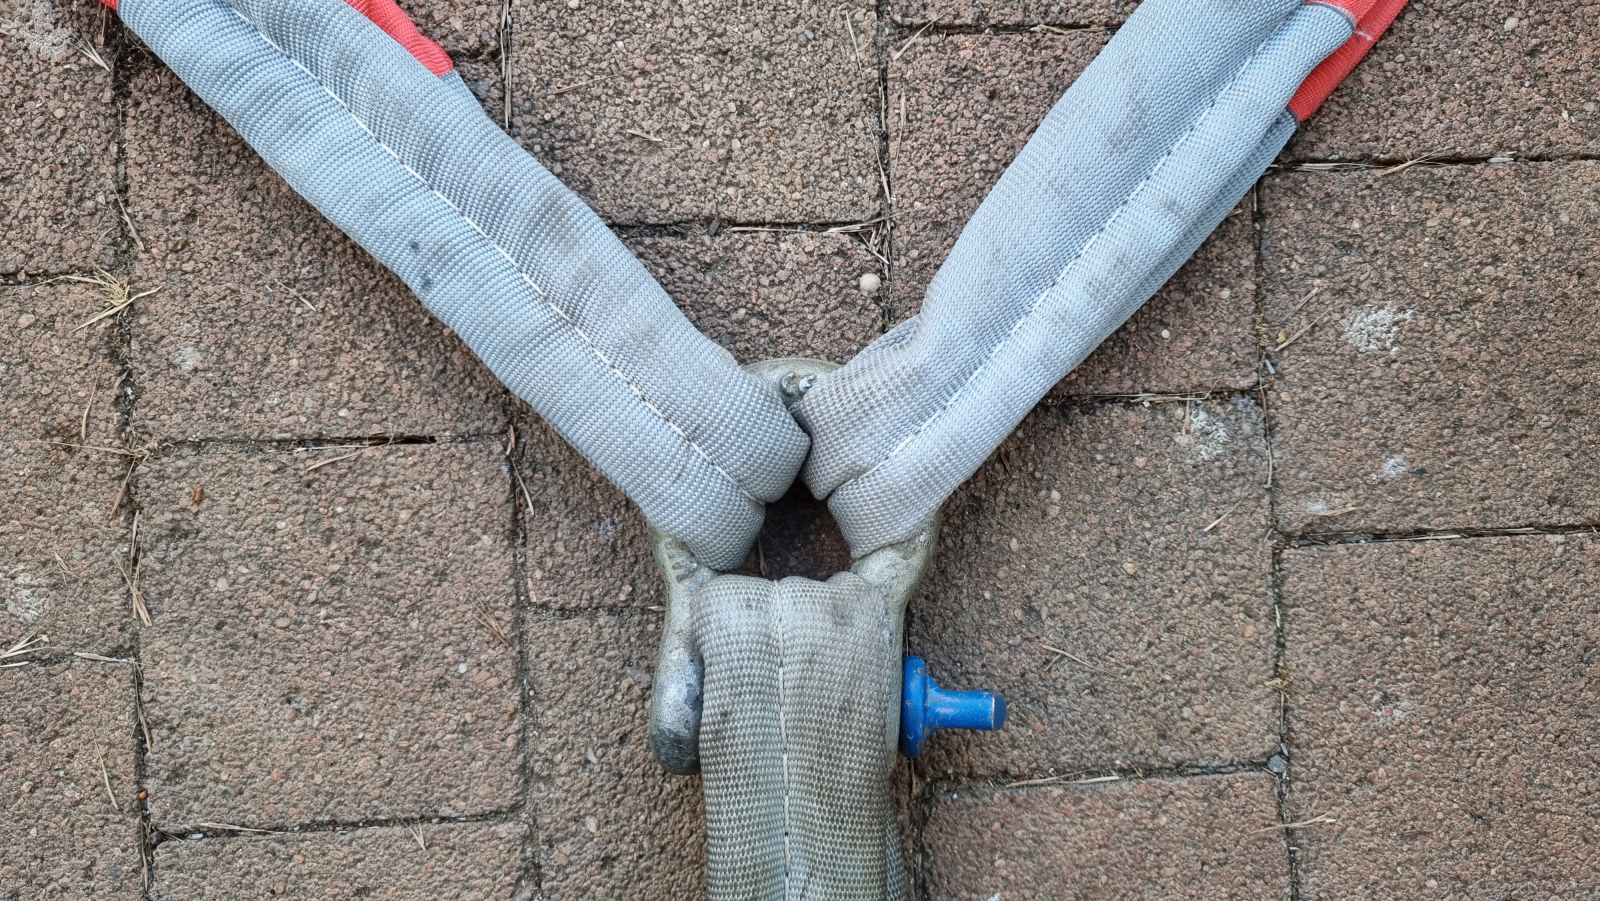
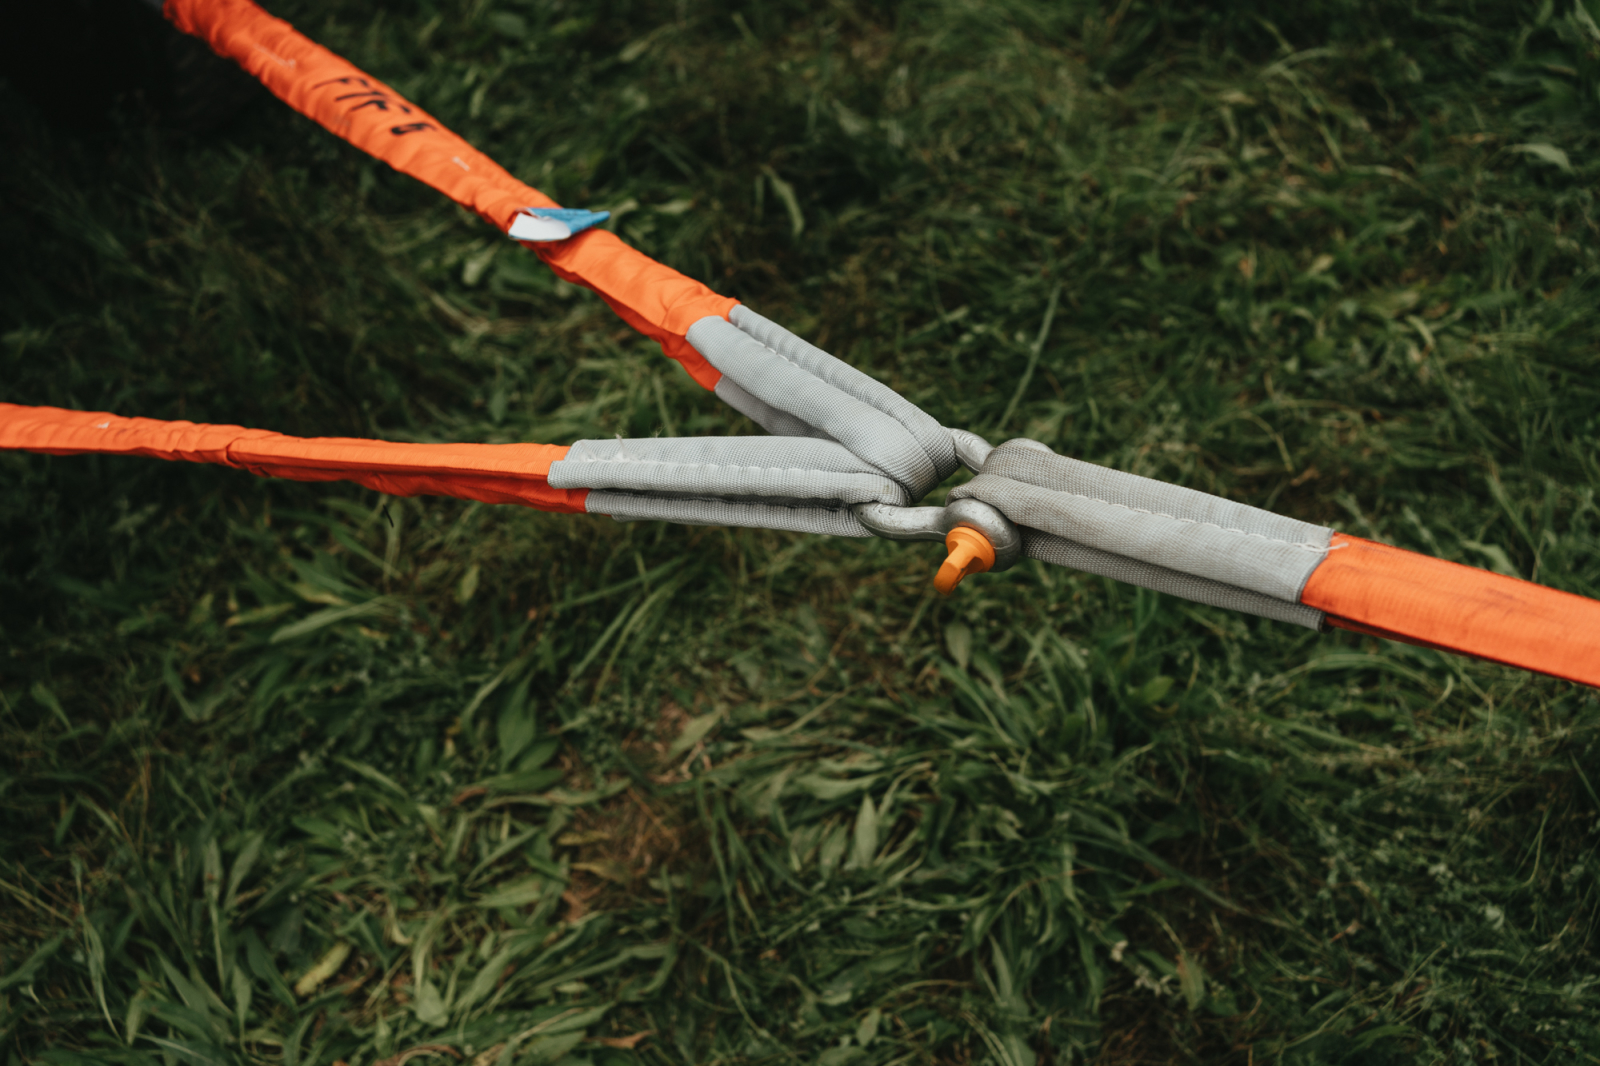
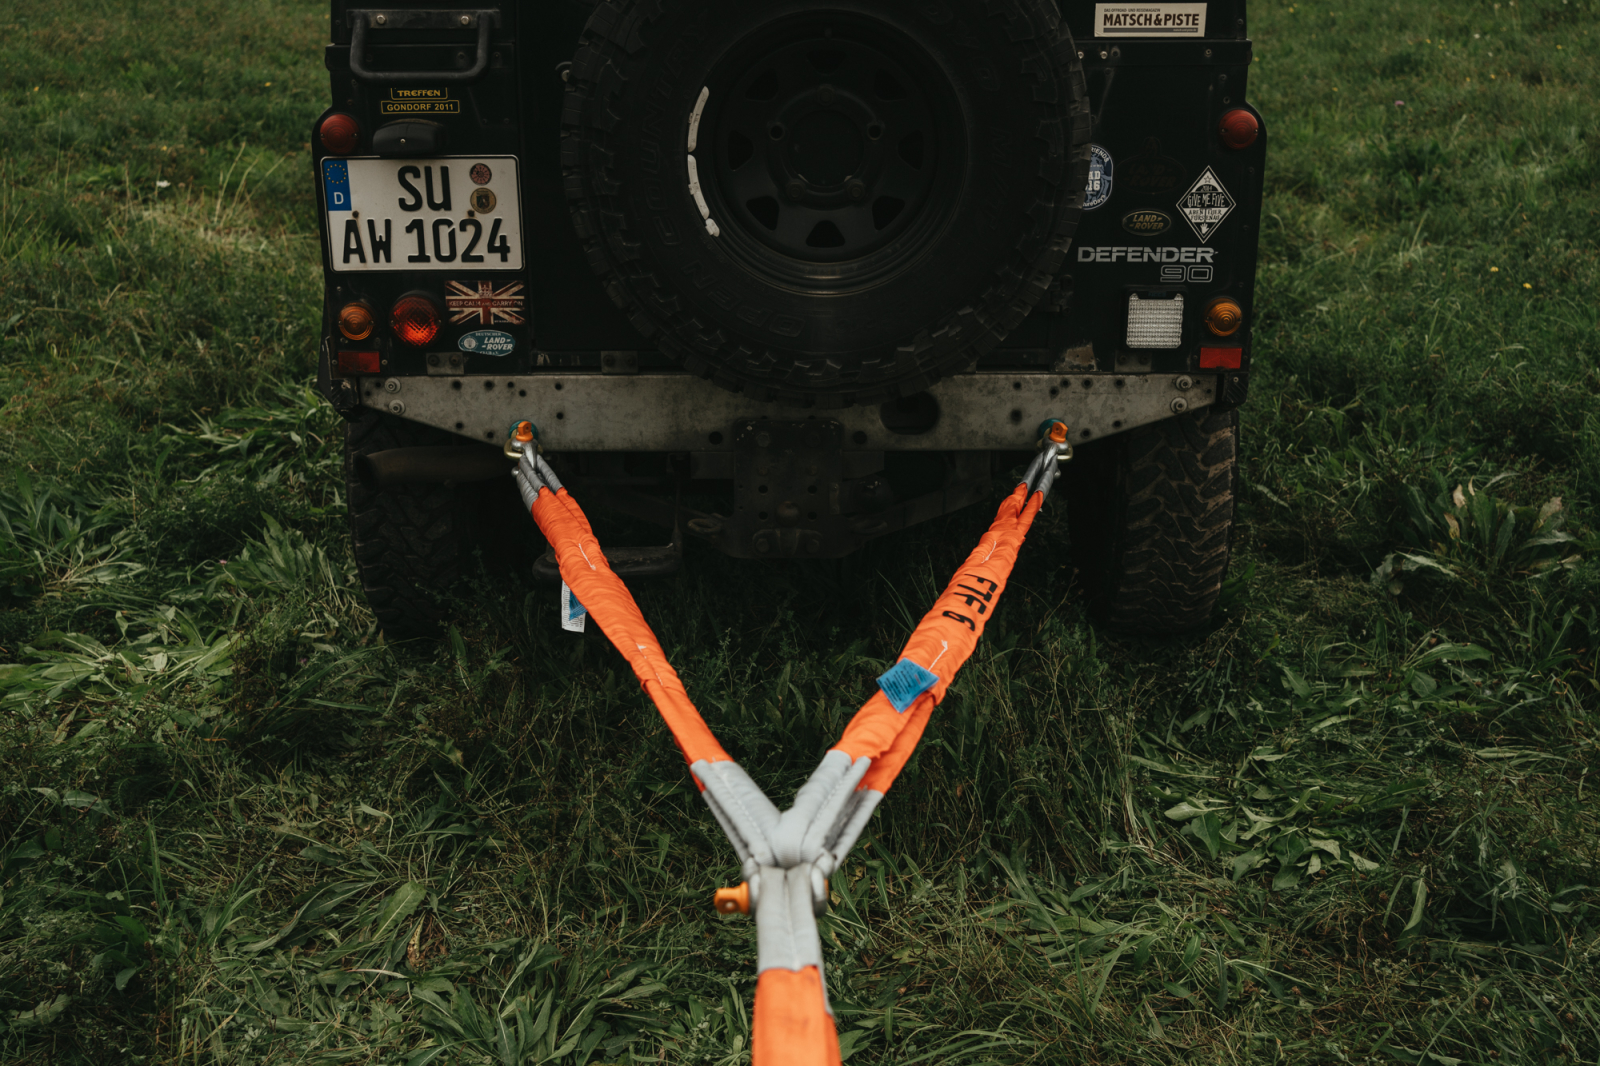
If you build a pull triangle in front of the vehicle, for example, the anchor points on the vehicle should rotate and fold, so they line up in the straight pull and you always have 100% of the WLL available. Then it does not matter whether they are chain or anchor shackles. The shackle that both slings and the winch hook go into should then be an anchor shackle. For rotating, folding anchor points on the vehicle, people also like to use swivel anchor points, which are made for exactly this. They are usually screwed into a solid mount. In the car and 4×4 range, thread sizes of M16 to M22 are mostly used.

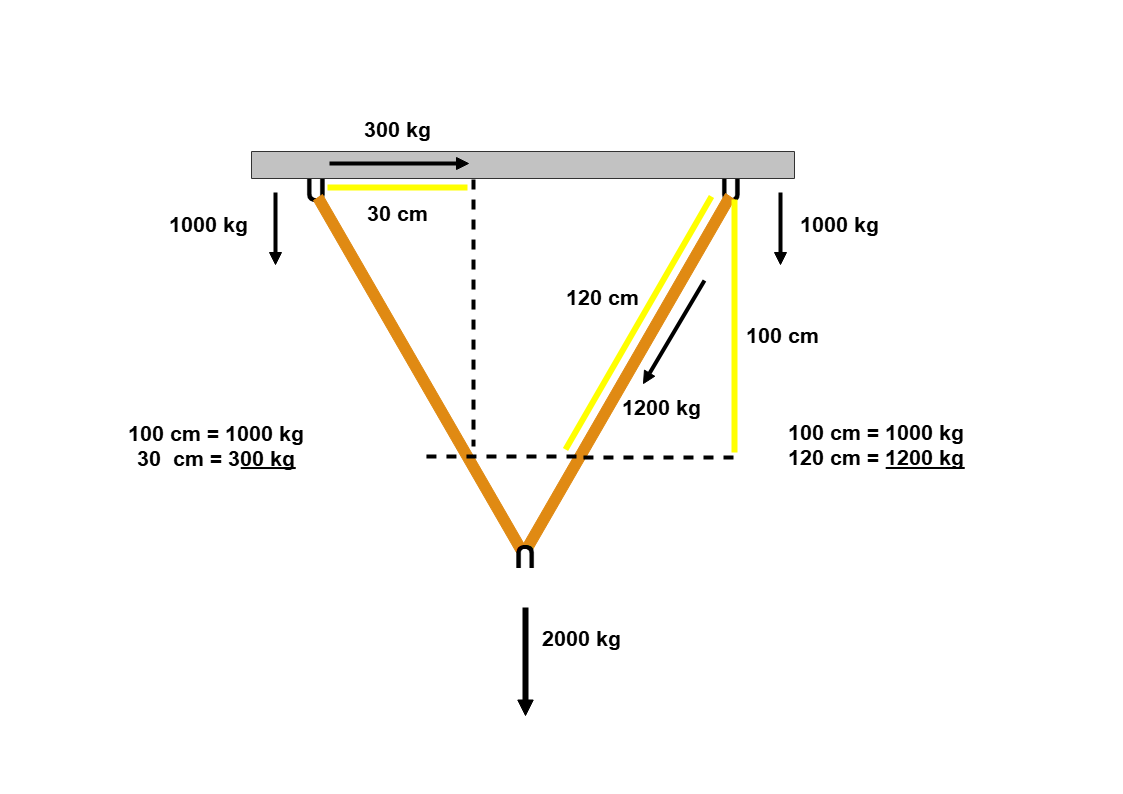
How to work out the load on a pull triangle yourself with a folding rule
If you know the pulling load (e.g. straight pull on a level road, about 4% of the vehicle weight; shallow mud about 33%; wet sand, bog, deep mud about 50%), you can easily work out the load yourself with a folding rule, or jointed rule as it is correctly called.
In the longitudinal direction, 50% of the pulling load acts at each anchor point of the pull triangle. Then there is also a load in the transverse direction between the anchor points and a resulting force on the slings.
Now make an arbitrary assignment and give half the pulling load a length, let us say 1/2 pulling load = 100 cm. Now measure 100 cm from the start of the sling at the vehicle along the longitudinal axis (straight pull) and go from there at a right angle to the sling. Mark the spot. Then measure from the anchor point along the sling to this mark. You put the value into a proportional rule of three:
length of the sling measurement (cm) x 1/2 pulling load (kg) : 100 cm = kg pulling load in the sling
If you now want to know how big the lateral transverse force on the anchor point is, go from the marked point on the sling in a straight line back to the vehicle. Now measure the distance from the start of the sling to this point. Put the values into a rule of three again:
length of the measurement (cm) x pulling load (kg) : 100 cm = kg lateral pulling load on the anchor point
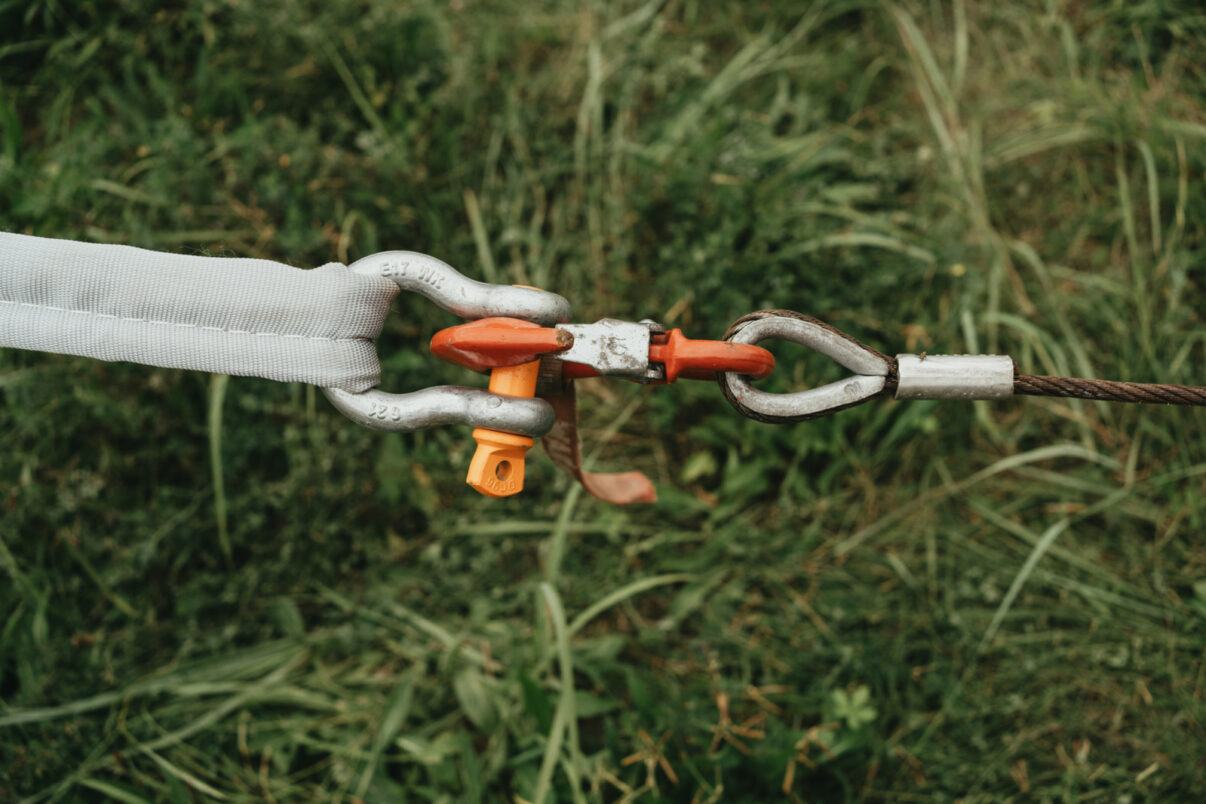
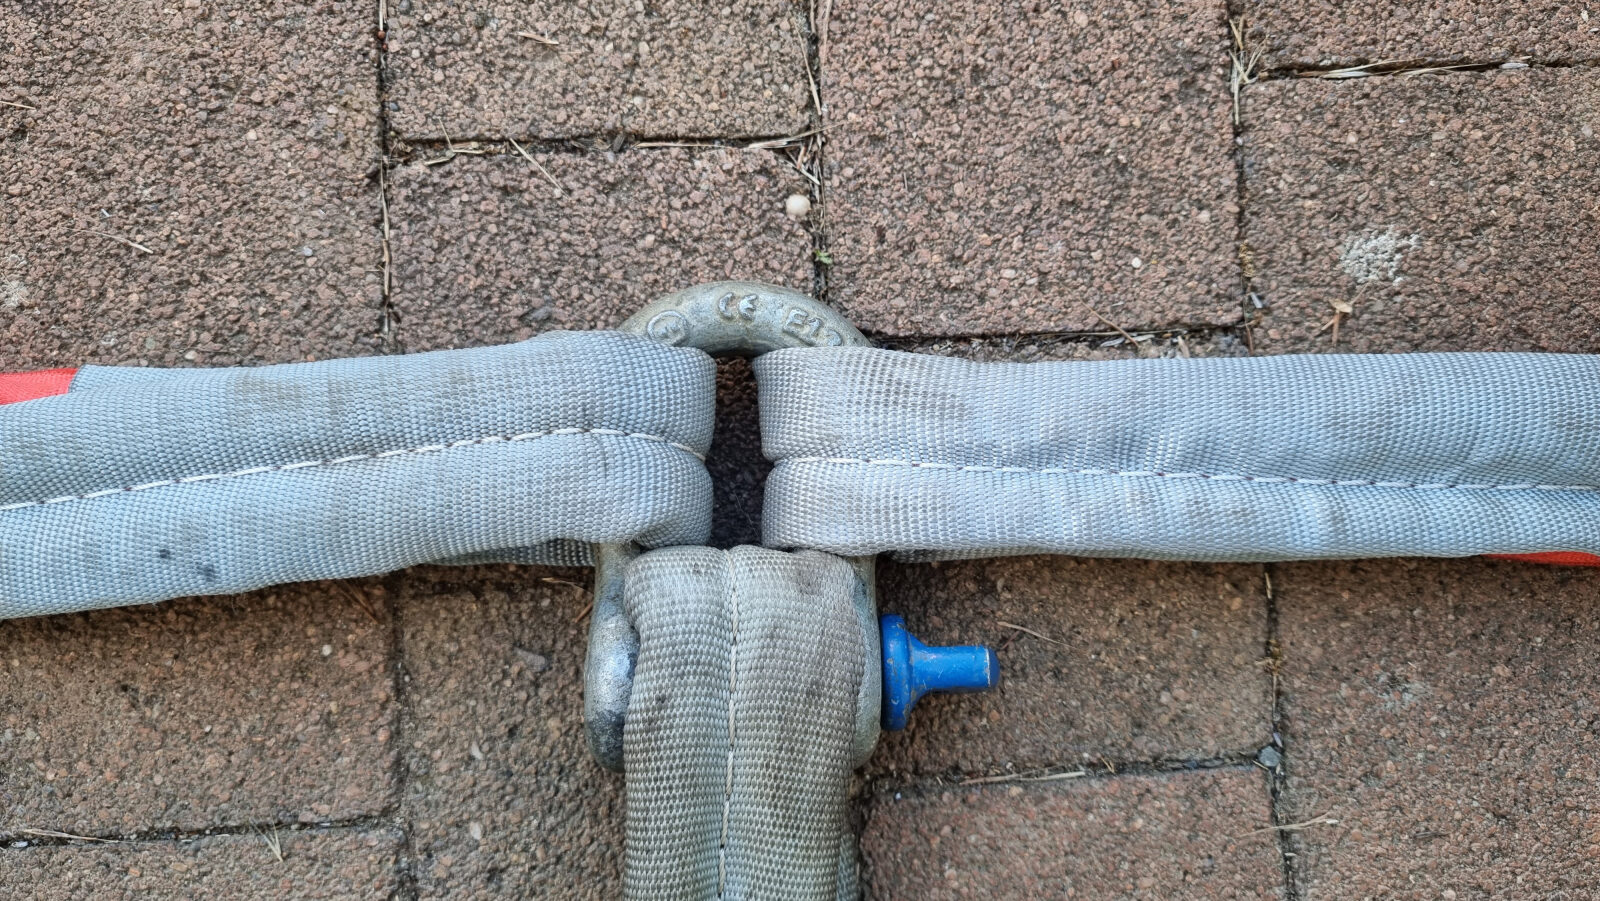
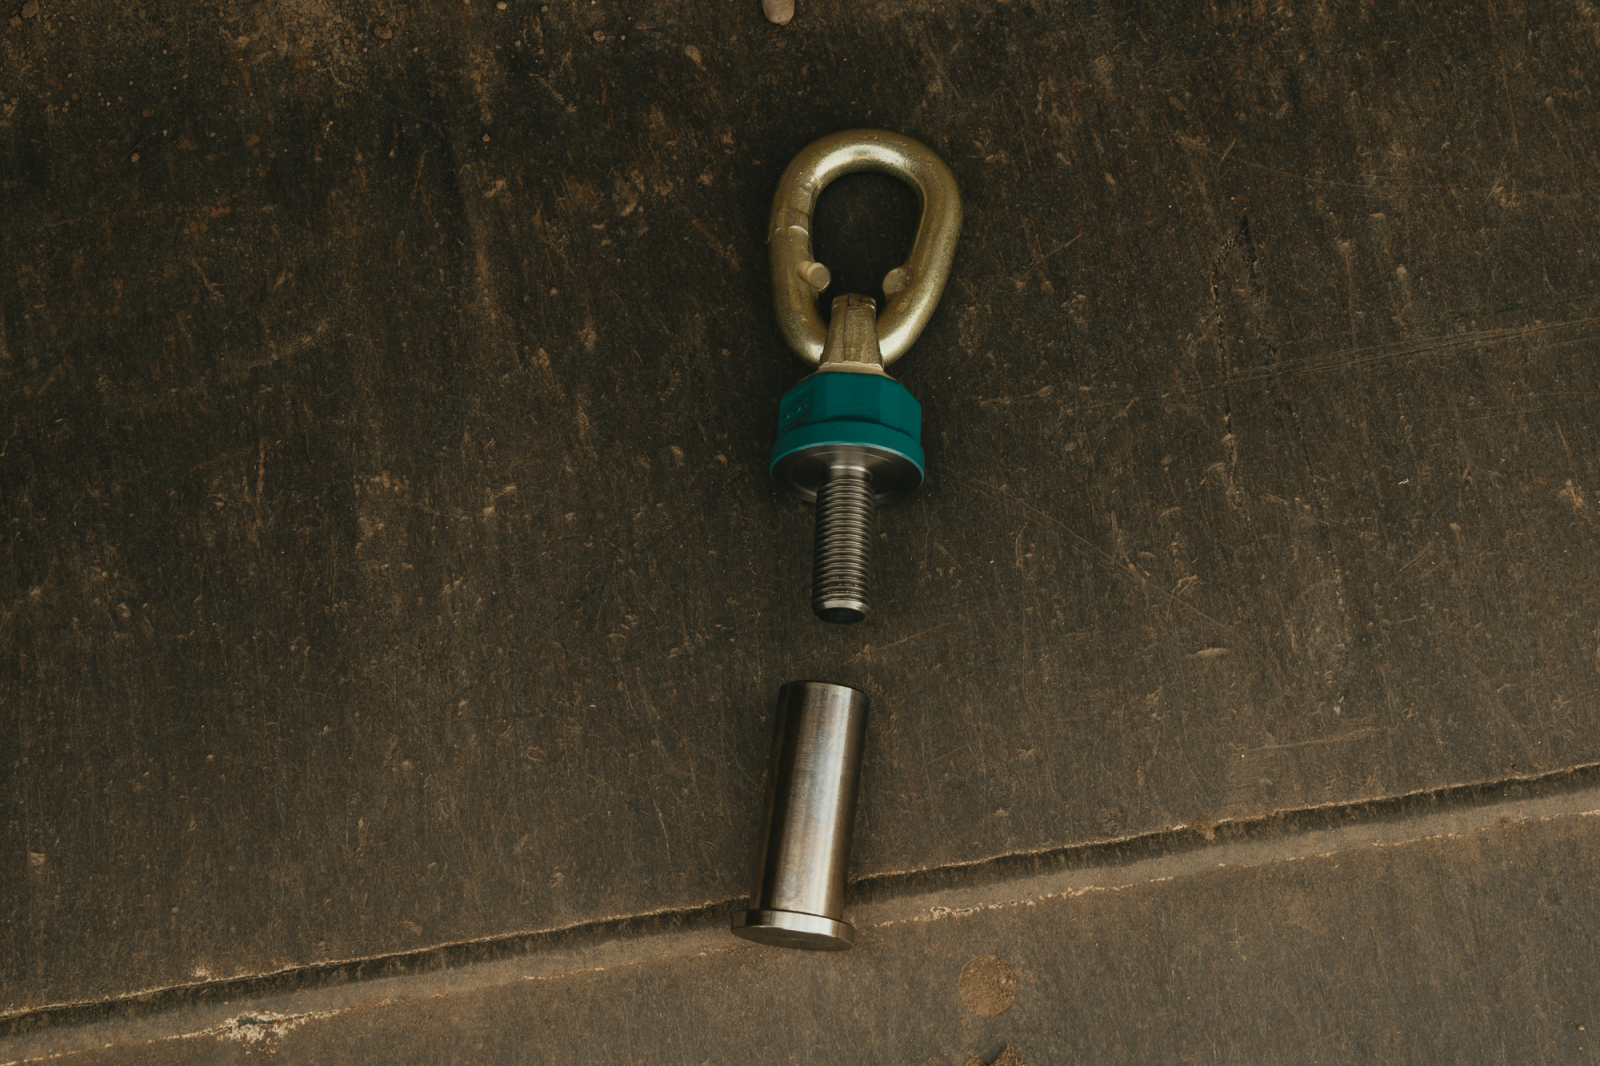
The pin
The pin overlanders probably use most is the threaded pin with collar and eye (type W), as seen here in the pictures. It has a thread and screws into one of the eyes. It could not be simpler. People often recommend backing the pin off a quarter or half a turn after hand-tightening it, so it can be loosened easily later.
That is exactly where two dangers lie. The first is that the pin’s load figures always refer to the fully screwed-in pin, with the collar sitting against the eye. In short, only then is it fully rated. The second thing is that the pin can be turned by the sling. When recovering, make sure you do not end up in situations where the sling can turn the pin.
That is why type W is not suited to longer-standing installations or to securing suspended loads for any length of time. Better to screw the pin fully in and keep a small pair of pliers in the car, so you can loosen the tight pin easily. Used correctly, the winch hook should be on the pin and the sling in the shackle body.
The safest shackle is the one with a bolt-type pin with a hex head, nut and split pin (type X). It can and may rotate, and the pin can be loaded sideways, because either the bolt head or the nut also takes the lateral load.
More rarely we come across the shackle type where the pin only has a split pin. It must not be loaded sideways, because the load then rests on the split pin, and that is too weak for it. You should avoid this type altogether.
Good anchor points on the vehicle
So where should slings, winch rope and so on be attached to the vehicle with a shackle? Everyone is well advised to set up sensible anchor points. Ideal are steel shackles fixed firmly and securely to the vehicle, or swivel anchor points that rotate 360° and fold 180°. This makes sure the shackle always lines up with the direction of pull, that is, is loaded straight.
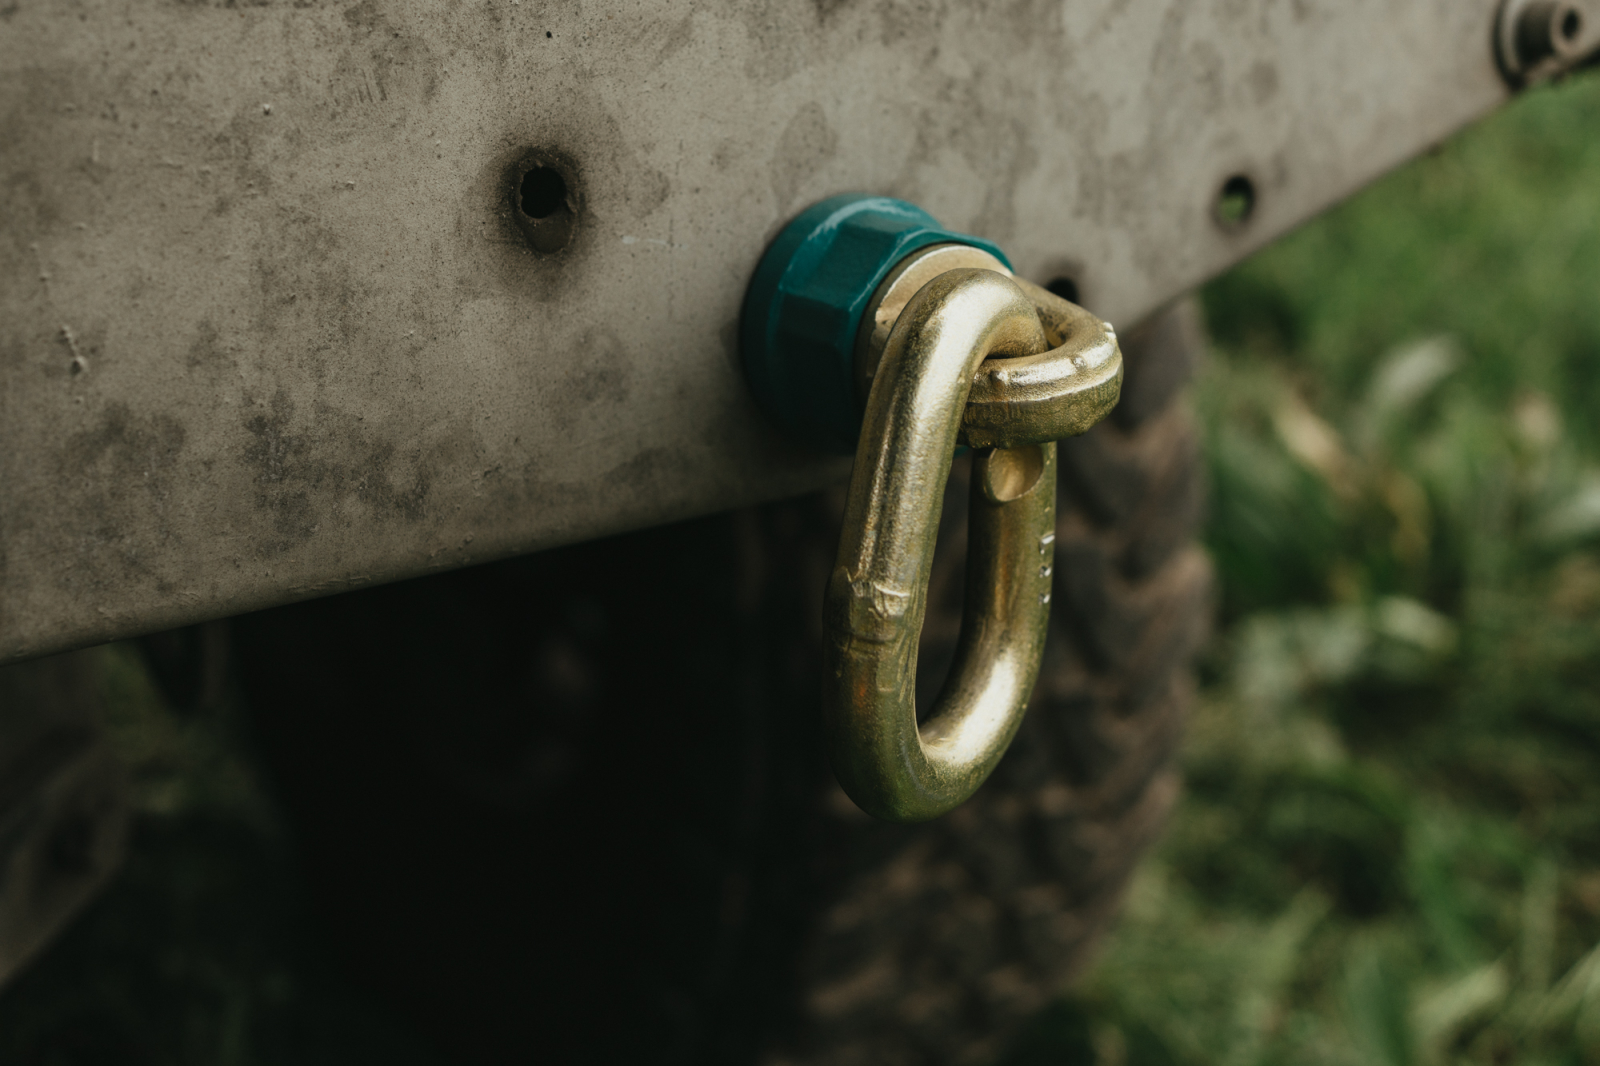
The anchor point should have a WLL of at least 1.5 times the vehicle’s gross weight, just like the winch. Some 4x4s come with points from the factory where such shackles can be fitted. If that is not the case, have a look in the accessory market. Sturdy front or rear bumpers often offer such anchor points, or are at least prepared to take them. Shackles can be mounted firmly in these, or they offer suitable eyes.
For soft shackles the eyes should be thick enough (a large radius) and have no sharp edges. There are also wide eyes into which steel shackles with a pin can be screwed very nicely and then stay at least 180° foldable.
The mounts for these shackles belong on parts joined firmly and solidly to the frame, like welded-on rear crossmembers or sturdy bumpers connected to the frame with adequately sized bolts. Cylinders with a collar are often used for this, with a large thread like M16 or M20. They are pushed through the openings in the bumper. The anchor points are then screwed into these cylinders. Welded-on eyes work well. They should be thick enough so the radius is right and you can use soft shackles too.
Using shackles correctly
A shackle really can be used wrongly. Depending on which way round you turn and hook it, you reduce its load rating, load it on one side or cause the pin to twist. In practice, of course, the steel shackle is often chosen so strong that a comparatively small load does not lead to deformation or breakage, even when used wrongly. Still, wrong stays wrong, and when it comes to safety, compromises are out of place. So here are a few examples of which way round a shackle is used correctly.
It is best when shackles are loaded along their longitudinal axis. That allows the greatest possible load.
Avoiding tilting
If the steel shackle is fixed to a thin anchor point, it can slip to one side or tilt. That should not happen. Common places for this are thin lashing eyes, which are meant more for lashing down or for securing a load in transport. They are sometimes found as an extra on a skid plate. Well meant, but an invitation to make a mistake, and for recovery suited, if at all, only to a straight pull.
So only attachments or anchor points wide enough to prevent slipping belong on the pin. With narrower attachments, packers should therefore be pushed onto the pin on the left and right of the attachment (washers, nuts, etc.) to prevent slipping. But be careful: if the eye is too thin, even these packers will not stop the eye from breaking when pulled sideways. Fix these packers directly to the shackle you always use for the winch hook, for example. Then you always have them with you.
Please bear in mind, in general, that sheet metal that is too thin may not be suitable as an anchor point. They should only be loaded in a straight pull along their longitudinal axis. Under sideways load they can bend or break. If your car is hanging off such a thin lashing eye, the risk of something breaking and causing harm to people and gear is high. Anyone heading off-road should sort out really reliable anchor points!
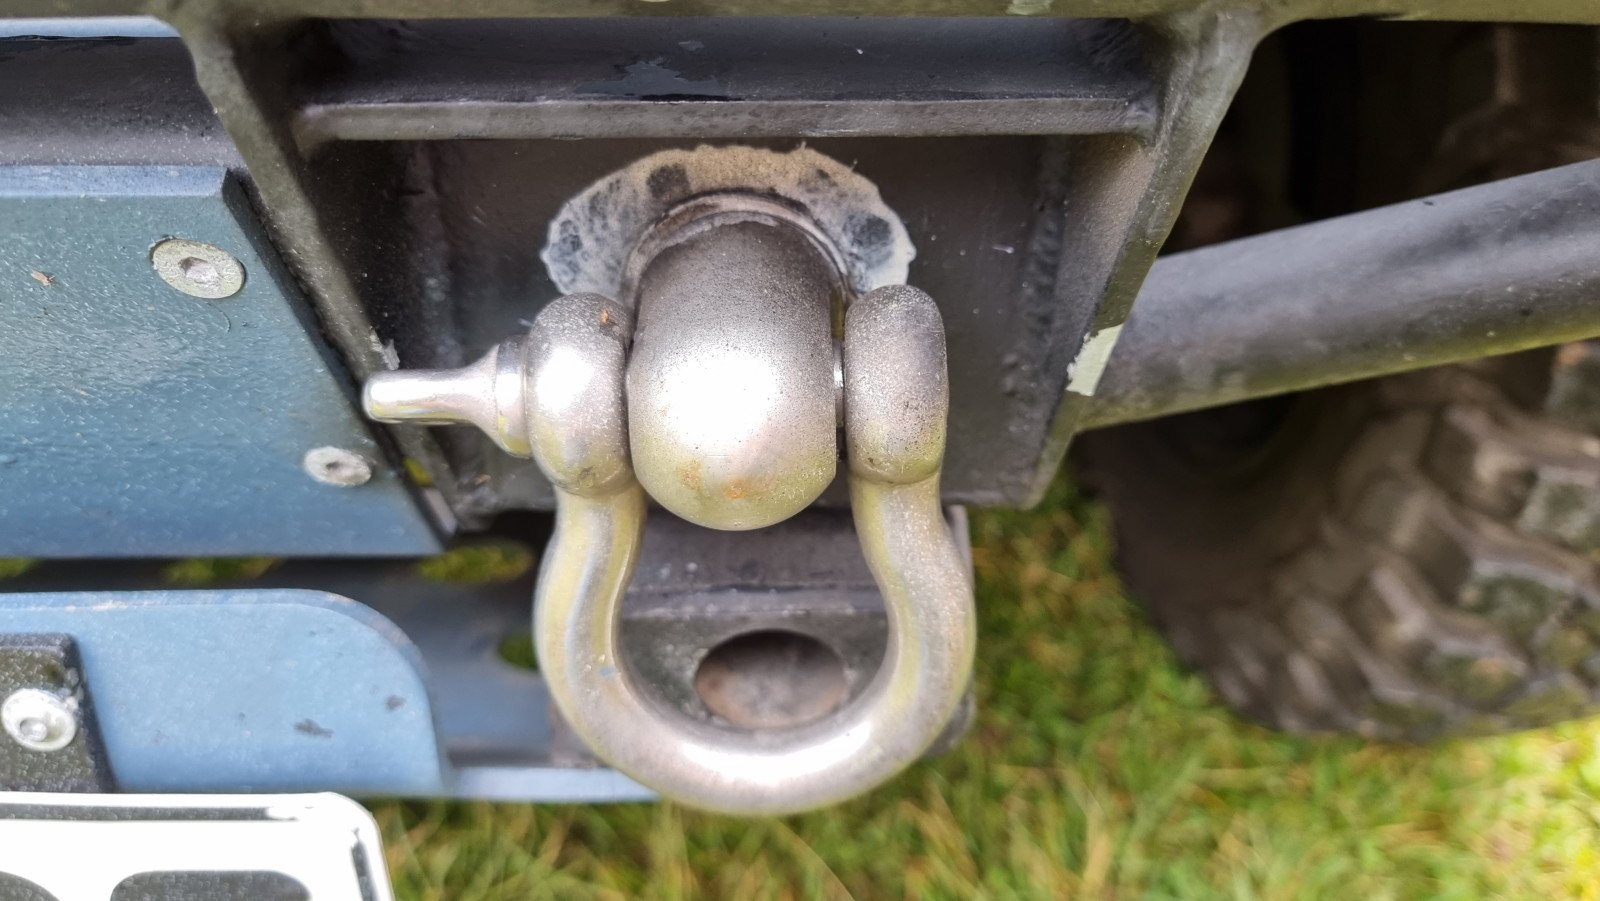
Shackle and tow ball: yes or no?
The tow ball is often used to recover a vehicle. Or rather misused? Opinions differ here. We recommend using the tow ball in only one case, namely when you want to carry out a recovery in “tow mode” with a static strap.
What does that mean? Recovering in tow mode means pulling a vehicle out very slowly and under control. Between the two is a static recovery strap, with no momentum, no shock loads, no “driving into the rope”. The strap is tensioned slowly and you drive on slowly. Either the stuck vehicle comes out or it does not. In the latter case the recovering vehicle’s wheels usually start to spin. Then the recovery method has to be changed. Only in such very controlled, slow recovery scenarios, where no shock and dynamic loads arise, do you simply place the eye of the strap over the tow ball. In any case the strap, lightly tensioned, should be checked once more for a good fit.
A shackle is not needed at all in such cases, and I would do without it. It would only make sense if it did not slip over the ball head. But that also means that from the inside, the pressure against the tow ball puts forces on it that want to bend it open. So I answer the question like this: putting a shackle over the tow ball makes no sense and is not needed.
In one case, though, using the tow ball is generally off limits! Whenever the tow ball hangs down, that is, the ball head sits on a long arm pointing downwards. Such hitches are found on taller vehicles, to bring the trailer back to level. This downward extension is a wonderful lever for amplifying the forces into the vehicle and breaking something. So hands off it!